Showing posts with label mods. Show all posts

Aug 21, 2016

Yamaha Bolt rim tapes / texts

Yamaha Bolt rim tape / text
I wanted to try to give the bike a sportier look with some rim decals. I wasn't sure how it would work out, so I cut the letters by hand before spending money and maybe ordering pre cut vinyl decals. I think it came out pretty good for DIY job. I'll probably do them again during the winter when I'll be taking the wheels off anyway. The design also needs some tweaking.

The rear wheel with decals installed

Yamaha Bolt / XV950 with rim lettering decals / tapes

A SHORT HOW-TO


1. Take some measurements of the rims
You need to know how tall the letters can be and how much space they will take. Note that the rim size measurements are not 100% accurate, but close enough.

2. Decide on a font and font size
If you will be cutting by hand, choose something with lots of straight lines. If the font is very wide you may run into trouble as the rims have curvature in many directions. The smaller the font, the more tears you will shed when cutting.

*2B. (optional) Design your rims using Illustrator or similar.
Use real world measurements to get an idea how it will look.

3. Clean the rims

4. Print the font outlines on self adhesive vinyl
You can buy sheets of this stuff and you can use it in a regular laser printer. DO NOT put just any sticker sheets on your printer! Melting inappropriate self adhesive sheets inside your workplace printer is not something you want to experience.

5. Cut the letters out using scissors and a scalpel type knife
This part will have you swearing or in tears or both.

6. Start putting the letters on
Print out a picture how the letters should space out. Helps to get you started. Italic or slanted letters are a bit more difficult to get right.

The lettering will of course bend to the contours of the rims and not be flat like in the picture above
Letters with thin outlines


Aug 13, 2016

Riser stiffening washers

Picture courtesy of SS Custom Cycle

Just a heads up. It seems that SS custom cycle has these for sale now so you don't need to have ones made when installing taller bars or risers. SS Custom Cycle website

If you don't know what these are for click & read below

May 17, 2016

Brake light issue


It seems that after installing the forward controls my brake light is not working correctly. When installing the forwards, the rear brake lever was positioned more upwards than it was with the standard setup. Not adjusting the lever angle was not really an option because of the ankle extension needed to press the lever would have been too much. As a result the spring pressure is not enough to fully restore the lever to the upright position. This in turn means that the brake light stays on from time to time. It's a matter of few millimeters and while I could sort of solve the issue by adjusting the brake lever light switch I think I should rather address the real issue of not enough spring tension.

As a solution, I've designed an aluminum spacer that my friend will hopefully soon machine for me. I'll keep you posted how it works out.

Yamaha Bolt rear brake lever spirng

Below, you can see how "soft" the spring is.


[UPDATE May 17th]

The plans for the "brake spring tightener"
Well, my friends CNC machine is down, but he tinkered the part for me by hand. I will get the final part at some point but in the mean while the hand made part works perfectly!
Brake spring tensioner in place


May 12, 2016

Yamaha Bolt tank decal - final


I finally came up with a design I'm reasonably happy with. The above pic is just a photoshop as I haven't actually gotten the decals from print yet.

Yamaha Bolt custom tank decal
This is the design I went with
The PDF / vector file for the decal can be downloaded here: https://www.dropbox.com/s/brqu07nvbn2krpo/yamaha_bolt_tank_decal.pdf?dl=0
(in case you want to have some made or modify the design)

EDIT [ May 17th]

Got the decals from print. I hope I don't **** up trying to put them on. Ordered one spare pair just in case...

Yamaha Bolt tank stickers

Decal installed
Added a Faster Sons decal too


Apr 8, 2016

Blacked out heat shields

Blacked out heat shields on the Bolt
Used heat resistant rattle can paint.

Mar 29, 2016

Say no to chrome


Continued with the pointless tinkering and blacked out some chrome bits with vinyl wrap.

Mar 28, 2016

Yamaha Bolt modded airbox

Yamaha Bolt modified intake
 First, there is absolutely no point in doing this. In theory there is more airflow to the airbox, but I don't think it's going to make any kind of difference in real life. I just had to tinker with something to pass the time while I wait for the spring to arrive.

Ad for the mod, I drilled 3 10 mm holes and added rubber grommets to make it look a little nicer. Word of warning here: The plastic material will chip if you drill too casually with a large (10 mm) drill bit. Don't ask how I know...


Yamaha Bolt airbox modified


Mar 25, 2016

Yamaha Bolt aftermarket intake / air cleaner options


The way I see it there are three reasons to go for aftermarket intake for the Bolt.

1. Performance
Unlike many mods, a free flowing intake will likely give you a few more horses. Not enough to justify the cost IMO, but still.

2. Leg room
The Bolt stock airbox is rather large and replacing it with a more compact one will likely improve comfort on the bike.

3. Looks
The stock box isn't the prettiest part of the bike. Installing an aftermarket one will make a big impact on the looks if that is important to you.


The available options, that I have come across:


K&N RK-3940

K&N RK-3940


TWO BROTHERS Comp-V High-Flow Intake System with V-Stack

Two Brothers Comp-V


ROLAND SANDS SLANTED INTAKE

RSD Carbon slant

Seen on Yamaha promo shots of the C-Spec. RSD website doesn't actually list this intake for the bolt though. It's available for a H-D Sporster.

MSRP: $ 470
More: http://www.rolandsands.com/product/308/rsd-slant-carbon-fiber-intake-kit/carbon-ops


COBRA POWRFLO INTAKE FOR YAMAHA BOLT

Cobra Powrflo

MSRP: $330


COBRA ROUND INTAKES


Cobra round


D&D RACING TWINTUNE

D&D Twintune

MSRP: $299

LOW & MEAN DUAL BARREL

Low & Mean Dual Barrel

MSRP: $200


LOW & MEAN SPIKE AIR CLEANER

Low & Mean spike


VANCE & HINES VO2 NAKED AIR INTAKE KIT

Vance & Hines VO2

MSRP: $160
More: http://products.vanceandhines.com/store/yamaha/71023/

SSCC AIRSTREAM

SSCC Airstream


SSCC "SKULL"

SSCC Skull

MSRP: $???
More: not yet available at SSCC website

SSCC "SPIKE"

SSCC Spike

MSRP: $339
More: not yet available at SSCC website

SSCC KING

SSCC King

MSRP: $???
More: not yet available at SSCC website

SSCC HARDTIMES
SSCC Hardtimes

SSCC BILLY BOB

SSCC  Billy Bob


KURYAKYN HYPERCHARGER

Kuryakyn Hypercharger


KURYAKYN ALLEY CAT

Kuryakyn Alley Cat


Mar 4, 2016

Yamaha Bolt tank decal II

Yamaha Bolt tank decal options, part II


Still not happy

Feb 26, 2016

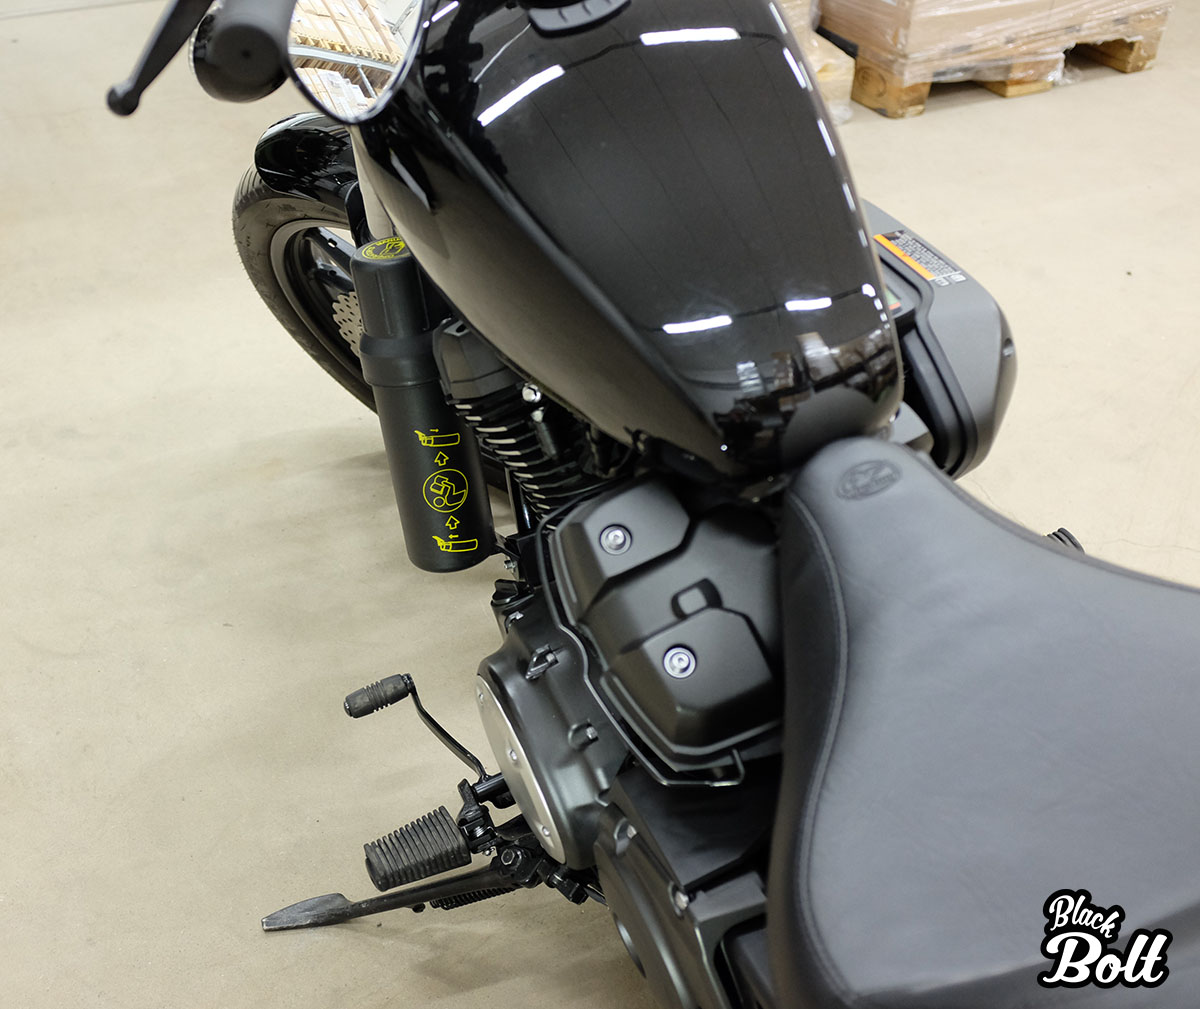
Fuel bottle holder / tooltube for Yamaha Bolt

Tool tube mounted on the Yamaha Bolt frame tube. 
I want to have emergency fuel for longer trips just in case... I haven't been able to come up with a good mounting solution for my square FuelFriend containers so I looked into fuel bottles. Bottles are easy to come by, but mounting them is not that simple. I didn't want any leather contraptions with chrome buckles anywhere near my bike so I needed come up with something else. I had a few tool tubes laying around from my adventure riding days, but I needed to figure out how to mount one on the bike.  I also wanted something that would not be totally unsightly and preferably easily removable. It's not like I need emergency fuel 99% of the time...

After some searching I found boat fender rack mounts that happened to come in two sizes. The lager 32 mm version was perfect for the frame tube.

I would have preferred to mount the tube lower on the frame tubes, but engine mounting brackets and such came on the way. I also tried to mount the tube horizontally, but the frame tube width and the mounting tabs on the tool tube don't match for that to work. The engine brackets are also again in the way.

The tool tube looks to be very close, almost touching,  to the engine, but in reality it's not.

I used 32mm plastic mounts that are originally intended for attaching fender racks to boat railings. left out the thin square bit.
Note a slot for a hex nut on the non-curved part. It allows for nifty and clean mounting of the tube.

NOTE: Google for "Nawa 32mm connector" if you want to buy the exact same mounting hardware.
The mount. The bottle mounts at the center hole.

Not pretty, but not totally horrible either.
The tool tube attaches to the mount with a single bolt.


For more information on tooltubes, go to : http://www.thetooltube.com/
(I have no affiliation with them)


Feb 9, 2016

Puig Custom II wind screen for Yamaha Bolt


I searched for a screen for a good while before deciding on a Puig Custom II. It certainly doesn't improve the looks of the bike, but I'm planning on mounting it only for longer trips. The cost is around $100 which is good value in my opinion. The Yamaha screen is going for a lot more. 

Installation, while simple, was a bit of a chore. It was hard to get everything lined up straight when working alone and I'm not entirely happy with it yet. I feared that the 5.5." risers might result in the screen mounts not fitting the bike, but there was no problem in the end. The inverted mirrors and screen mounts mean that I'm running out of real estate on the bars though.


Puig custom II package contents

The attachment to the screen (plastic cover removed)

The attachment to the bars (plastic cover removed)

Attached to bars

Add caption

Installation instructions

UPDATE [May 4th, 2016]
I thought that the screen would really work, but after riding back to back with my bike and a Sportster without a screen... I took my screen off. Clean air, without buffeting is just so much more pleasant even if it means some added wind pressure.