Dec 30, 2015

Acrapovic exhaust sound on Yamaha Bolt


With and without DB-killer.

The DB-killer for the Acrapovic pipe for Yamaha Bolt

Dec 27, 2015

Yamaha Bolt riser bushings / washers - the final solution


The custom made washers (4) have finally been installed and the handlebars now have virtually no play at all. The effects on vibrations is a big question at this point as test riding is not possible due to the sub zero temperatures.

Below you can see the amount of play before the installation


Yamaha Bolt top down view
Top down view on how the bars are now

UPDATE [16.8.2016]

Picture courtesy of SS Custom Cycle

Just a heads up. It seems that SS custom cycle has these for sale now so you don't need to have ones made when installing taller bars or risers. SS Custom Cycle website

Dec 18, 2015

Testing luggage

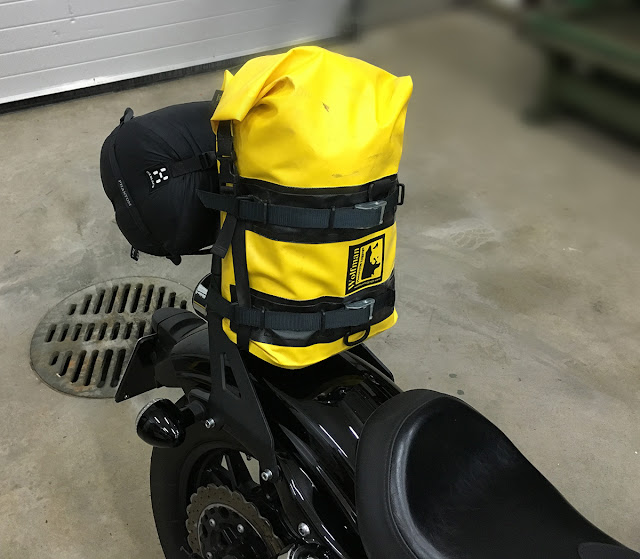
Waterproof Wolfman luggage on Yamaha Bolt

I tried mounting one of the two Wolfman bags that I have on the sissy bar. Seems to work great and it's actually easier to mount and take of than on the luggage racks I had on the previous bike.

If tightened properly the bag is not resting on the fender, so it shouldn't scratch the paint. The bag however does not work as a back rest as I originally planned. There is just too much space between my back and the bag. I need to either wear a back pack or mount a much larger back on the sissy. Bummer.


Nov 19, 2015

Pullback riser installation on Yamaha Bolt

5.5" pullback risers on Yamaha Bolt
Easy peasy, right? That's what I thought, but turns out that's hardly the case. For a proper rise and pullback you need more than 2" of rise and for that to be possible you need to

1. change all cables for longer ones (clutch, throttle, brake)
2. reroute the electrical wires going to the bars


Tank must come off for the cable swap

For the cable swap you need to first empty the front brake system of fluids, remove the tank and then of course you will need to refill and bleed the brake system, remove old and nstall the new cables. I bought the Yamaha factory extended cables mainly because I could get them much faster compared to ordering them overseas.

The Yamaha factory extended cables aren't really that much longer. They will not work for proper apes.

Now for the risers themselves, you need to figure out what models and lengths will work because the speedo will get in the way if your new risers are the wrong length or shape. For example, I don't think pullback risers shorter that 4.5" will clear the speedo.

5.5" risers leave plenty of room between the speedo and bars
Once you score the risers you need to also remember to order top clamp bolts and the actual riser bolts as the metric top clamp bolts will most likely not fit and risers tend to come sans the actual riser bolts.

- I bought my risers and top clamps at J&P cycles. (had to order them separately also)
- The risers bolts were ordered from SS Custom Cycles along with some other stuff
- The top clamp bolts were chopped down to 7/8" from 1" bolts as UNC bolts seem to rarer than diamonds in here.

The actual installation, while slow, went relative smoothly thanks to the instructional video by Chaparral Motorsports.


Results
I'm very happy with the new ergonomics, but I have a few worries too. The bars now have much more leverage which in turn means that there is a lot more play/movement in them because of the rubber mounts in the top triple tree.


Yamaha provides metal "stiffening washers" with their mini apes ( see above video at 10:21) , but since I kept the original bars I will have to find some on my own. I'm hoping the http://www.yamahastarbolt.com/ forums will come through and someone will post the measurements of the washers so I can either buy them or have them made.


My own measurements would suggest that the washers should be around
outer diameter 35 mm
inner diameter 20 mm
Thickness ~ 2 mm

Judging from the installation video the metal washer is a slightly loose fit.


EDIT
Score!
Apparently the Yamaha Mini ape replacement washers are:
outer diameter 1.375" = 35 mm
inner diameter 0.84" = 21 mm
Thickness ~ 2,5 mm
>> See here (Reply #48) 

The closest I could find is DIN 433 M20 washer which is:
outer diameter 34 mm
inner diameter 21 mm
Thickness 3 mm

It might work...

The top clamps also tighten "all the way" meaning that there is no gap left on any side. This means that if the bars start to move there is no room for tightening them. The bars feel solid for now, but I'm left with an uneasy feeling.

The top clamp looks clean this way, but may not be tight enough

The Yamaha extended cables work pretty well with the 5.5" rise, but I don't see that there is room to go much higher. Rerouting the cables will likely help, but my cables are now running the "OEM route".

Nov 13, 2015

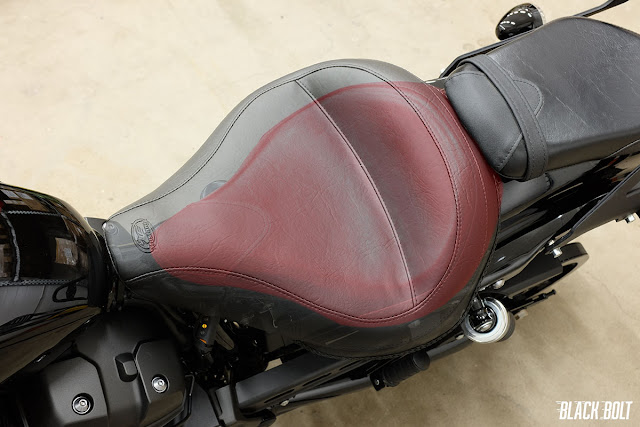
Mustang solo seat for Yamaha xv950 / Star Bolt

Mustang solo seat and Yamaha Bolt OEM  seat size comparison
Mustang solo seat and Yamaha OEM  seat size comparison
 I tried on the Mustang seat while I was installing the forwards. What should have been a 2 minute job turned into a half an hour wrestle with seat. The seat just refused to set so that I could attach the mounting screw. The instructions said that if this happens I should loosen the rear fender struts. That helped nothing. Others have reported the same problem and while i suspect it will go away after some use it sure is annoying!

Can't say anything about the comfort yet, but it should be  comfortable.


Mustang seat is somewhat higher than the stock one

Mustang seat is also quite a bit wider


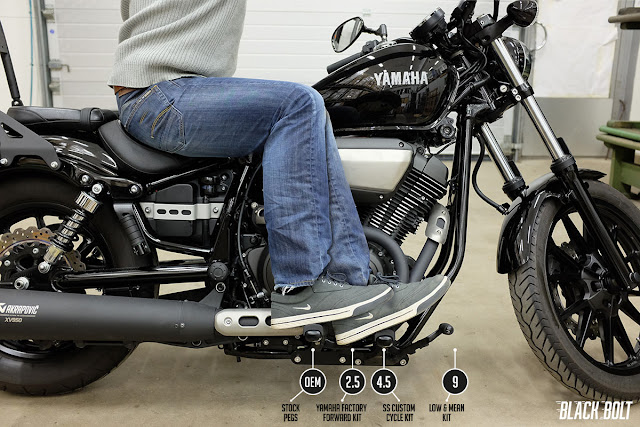
Forward controls for Yamaha Bolt by SS Custom Cycle

Yamaha Bolt forward control lengths
Overlay image of the SS custom Cycle forward controls and the Stock controls

I got the SS Custom Cycle forwards mounted yesterday. The kit itself is of reasonably good quality. Personally I would have preferred the relocation bars to be made out of steel instead of aluminium, but the parts are plenty strong as they are now. I have to say though, that the mounting instructions leave a lot of room for improvement, Tiny B&W pictures and the instructions don't really help with the tricky parts such as how to actually deal with the extension rods for the shifter and rear brake for example.

As for the peg location, I don't think I could make it work with anything much farther than the 4.5" that the SS kit provides. The protruding engine on the left side combined with the extended feet position would cause the heat guard to rub against my leg. The 4.5" extension does seem to make the rather big airbox much more comfortable as my leg now hits it in a different angle which doesn't feel uncomfortable anymore.

UPDATE 15.4. 

After some riding I'm happy to say that I'm able to rest my ankles on the pegs quite comfortably. This was something that I wanted to achieve with the forwards, it's a usefull option to have on longer stints. It's not a comfy option with sneakers, but with proper riding boots, there is no discomfort.


Nov 12, 2015

License plate holder modification on Yamaha Bolt

The  plate is now about 2" higher than stock

The tail of the bike doesn't look right to me. For the best look the bike would need a side plate holder, but as a first aid I moved the licence plate up a bit and removed the excess plastic around the plate. The reflector is now gone, but will be mounted on the back of the sissy bar.

Vibration damping mounting hardware

3rd person GoPro motorcycle mount


I have long wanted to fabricate a 3rd person motorcycle GoPro mount, but I haven't been able to come up with a reasonably portable and elegant solution on my previous bikes. With the Bolt, the mount could finally be doable due to the sissy bar of the Bolt providing an excellent rigid and elevated mounting point.

The mount

The mount is essentially an inverted camera monopod. The GoPro bar mount is attached to the rubber end of the monopod and the monopod is zip tied to the sissy bar. By doing it this way the height and orientation of the camera is fully adjustable. On the shaft of the monopod I have zip tied several silicon hoses to dampen vibrations and ad friction between the sissy bar and the monopod. The monopod attaches very securely with only 2 zip ties.

I haven't been able to test the rig yet and it seems I wont be for some time as winter has descended. I'll get back to this when the weather allows it.


The monopod is zip tied to the sissy bar. The sissy bar has silicon hoses zip tied to it to prevent scratching, dampen vibrations and prevent the monopod from moving.


Monopod extended half way


Nov 7, 2015

Yamaha Bolt sissy bar backpack


My old Kata camera bag has a trolley strap that I have never found any use for. Looking at the sissy bar I started to wonder... Today I brought the bag along with me to the garage. Low and behold, the bag fits on the sissy like a glove! The strap is the perfect size and once you drop the bag in place it sort of automatically locks in place. The Kata bag even has a feature that the shoulder straps can be tucked away so there will be nothing flapping in the wind while you ride.


Kata camera bag on a Yamaha Bolt sissy bar


Nov 3, 2015

Extended factory cables for Yamaha Bolt

Yamaha Bolt extended factory cables
The cables arrived today. I'm still missing bolts for the risers, but now that I have the cables I can at least get started on the handlebar ergos project.

Yamaha Bolt tall and short sissy bars

Yamaha Bolt tall and short sissy bars side by side
I replaced the short sissy with the tall one, I personally don't like the look of either one too much, but the tall one will provide a sturdy mounting point for attaching my luggage for longer trips.  I took some comparison shots in case someone is pondering which one to get.


Nov 1, 2015

CTEK Comfort indicator for Yamaha Bolt


I've been stranded by a dead battery couple of times now and ever since that happened I have started to install a battery charge indicators on all my bikes. Basically the CTEK comfort indicator is a plug that allows you to plug in the battery tender quick and easy AND it has three charge indicator lights that let you know the current charge of the battery. RED for low, YELLOW for medium and GREEN for full charge. This is especially handy if you are forced to let the bike stand for longer periods. Just a quick look and the blinking light will instantly tell you if something needs to be done. Letting the battery run empty is generally a bad idea and often kills your battery for good.

In normal use the plug is kind of useless as the bike is ridden frequently, but then again if the charge starts to fade during normal use you get a nice heads up that maybe it's time to replace the battery (or search for other issues...)

CTEK comfort indicator on Yamaha Bolt
I placed the indicator near the tool kit / left side panel. If I want I can tuck it out of sight behind the side panel.

Oct 30, 2015

5.5. inch pull back risers for Yamaha Bolt

The 5.5 inch Milwaukee Twins pullback risers
The 5.5 inch Milwaukee Twins pullback risers for Yamaha Bolt (maybe...)
The risers arrived (from J&P Cycles). No clue yet if I can get them to fit, but judging from everything I've Googled, it should be doable. I'll need to change the cables first AND source the bolts for the top clamps. The product info doesn't state what kind of bolts I need nor does it say anything on the package. Getting UNC bolts here in soviet Europe is not so easy. Most hardware stores don't stock UNC bolts to an extent that you could just march in a see what fits.

EDIT: apparently I need four 5/16"-18 x 7/8" bolts

SIDE NOTE
Inerestingly it seems that the Yamaha factory Apes or Tall Handlebars - 1TP-F61B0-V0-00 as they are officially called come with hard washers that replace the rubbers insert inside the triple tree. This is apparently to reduce the amount of play on the tall bars that by nature will have more leverage than the stock ones.

I found this out by watching the excellent Chaparral Motorsports handlebar installation video.
Jump to around 11:12 for the part showing the washers.

I've posted on the http://www.yamahastarbolt.com/ forums in hopes of getting good close up pictures of the washers and maybe even measurements. I don't want to buy the bars just to get a pair of washers. 


Screen grabs
Yamaha Bolt riser rubber washers still in place

The new "hard washer"
PLEASE, go visit http://www.chaparral-racing.com/ they deserve some business for doing such good videos

Oct 28, 2015

Yamaha Bolt ergonomics


Yamaha Bolt stock riding position
While the Bolt is cruiser type bike, the riding position is not very relaxed for a guy my size (5'8). Ideally I would like my feet to be further forward and the bars to be a little higher. The standard factory setup is very similar to a Sportster Iron, but I wan't happy with that either when I test rode one. The Sportster 72 on the other hand felt rather comfy so I'm making changes to get the Bolt riding position closer to that.

About forward controls

The Sporster standard forwards are 6" forward from the factory mids. This is pretty ideal for me, but for the Bolt 6" forwards are not an option (at least to my knowledge). The factory forwards will move the pegs 2.5", The SS forwards 4.5" and The Low & Mean forwards a full 9" which I think is too much for me. The actual distance might just work, but the bolts engine is sticking out from the left side in such a way that I think it will press against my inner thigh. If the 9" forwards were to work they would have to be set up significantly wider than the standard pegs. I believe that they actually are too, but I  don't know by how much which prevents from making a DIY mock up for testing.

The engine is not centered on the Bolt.


Harley Sportster stock riding position


With the planned changes (5.5" pull back risers, Mustang seat and SS Custom Cycle 4.5" forward controls the forward lean will be reduced to near zero and the knee angle improved a bit. These estimations are based on the on the excellent cycle-ergo site's "calculator".

I estimated that the 5.5" pull back risers will produce roughly 4" rise and 1.5" pull back due to the mounting angle. I also estimated that the Mustang seat will raise me about 1".
Bolt modified riding postition


Oct 26, 2015

Motorcycle offline navigation by phone


I've been using an old cheap beaten up TomTom for years now. The reason being that it works and it plays well with the Tyre route planning software. For pleasant and successful route planning Tyre has been much more important than the actual device mounted on the bike. So far there hasn't been an App available that would do what traditional GPS combined with Tyre have been able to do, that being easy route & waypoint planning and off line navigation.

My Requirements

When I'm planning a trip, what I want to do, is plan the route exactly as I want. Not  just "find scenic routes" not "avoid highways" etc. So far doing this with the actual navigator has been a nightmare. Phone apps have not been much better and very often there is a requirement for internet access.

Near constant mobile internet access on a proper road trip that usually takes me to other countries is either totally impossible / impractical or costs way too much.

My approach has been to use Tyre to plan my waypoints on the computer and then upload the finished route to the TomTom. No internet required on the road and the planning is a pleasure with a computer mouse and a big screen.

The current/previous way of planning a route and navigating on a motorcycle
1. Plan the route with Tyre
2. Export the .ITN file to the TomTom navigator
3. load up the route from the TomTom menu
4. ride!

With the new MotoEye App this is about to change. It looks like I can finally retire the TomTom and only have my phone with me for navigation. With this in mind I'm designing my "cockpit" so that I can easily see my phone and keep it charging while riding. The good thing is that I can still plan the route with the computer and everything works as before but I know have one less device to lug with me.


The future way of planning a route and navigating on a motorcycle?
1. Plan the route with Tyre
2. Export the .GPX file to dropbox*
3. Load the .GPX file to the MotoEye App*
4. Ride

* For this to work you need a dropbox account and dropbox installed on your phone

I found out about the MotoEye a bit too late as the riding season is pretty much over. I'll have to wait for spring to test it properly, but so far it's looking promising.

For some reason most of the promising navigation apps designed for motorcyclist do not offer offline maps. That's pretty much a deal breaker for anyone planning to even a bit off the grid or go abroad where mobile data transfer charges can be obscene. MotoEye seems to be the only one that allows me to plan my routes on the computer and offers offline maps. If there are other options out there, please let me know!


Oct 25, 2015

Tool box

 Had to take a peek in the tool box. Inside was two black pouches which contained an assortment of "toolkit quality" tools. Better than nothing, but I think I'll replace most of them and ad some tools of my own. From the looks of things the previous owner has never opened the container.


Ram mount X-grip phone holder for Yamaha Bolt

Test installation of the Ram Mount X-grip.
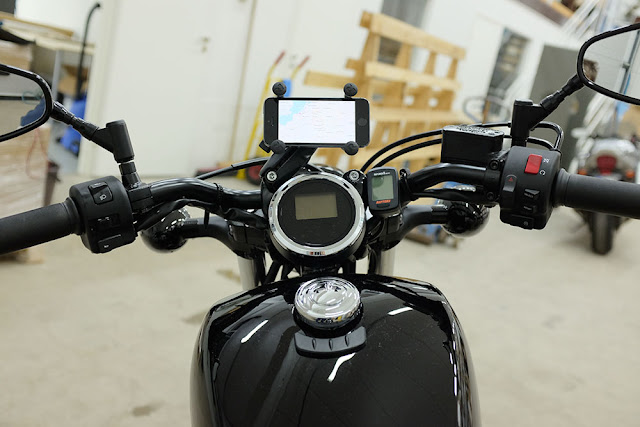
I will be getting risers so the installation is just to see how the parts fit together. I have two different length arms for the mount, but it seems that bu using the longer one I can get the phone pretty much smack in the middle. The reason I want my phone mounted this way, is that I have plans for using as a navigator. Previously this hasn't been feasible because of mobile internet restrictions on other stuff, but it looks like I can retire my old TomTom soon. I'll post more about this later.

Ram Mount ball the Yamaha Bolt stock riser

The ball is pretty unobtrusive

Ram Mount X-grip holding an Iphone on Yamaha Bolt
Iphone on the X-grip

Ram Mount X-grip holding an Iphone on Yamaha Bolt
Quite ok so far

EDIT Feb. 11th

The mount was moved to the center of the bars once the pullback risers were installed. The main reason was that soviet europe could not provide me with a suitable UNC bolt that would fit the risers.